wordpress のブロックテーマは直観的にウェブサイトを編集することができるのでとても便利であるが、カスタマイズ部分が少ない欠点がある。
このときにはテーマの functions.php を配置して以下のようなカスタムスタイルを追加ことができる。
コード
function themeslug_register_block_styles() {
    register_block_style( 'core/group', array(
        'name' => 'default',
        'label' => __( 'Default', 'themeslug' ),
        'is_default' => true,
        'inline_style' => '.wp-block-group.is-style-default {}'
    ) );

    register_block_style( 'core/group', array(
        'name' => 'widget',
        'label' => __( 'Widget', 'themeslug' ),
        'inline_style' => '.wp-block-group.is-style-widget {
            background-color: #faf0e6;
            border-radius: 25px;
        }'
    ) );
}
add_action( 'init', 'themeslug_register_block_styles' );
コードの分析
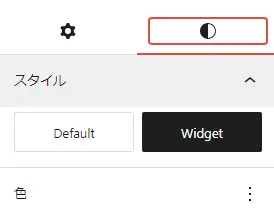
最初には themeslug_register_block_styles() という関数を作ってください、他の名前も大丈夫。そしてデフォルトのスタイルを設定してください。
register_block_style( 'core/group', array(
    'name' => 'default',
    'label' => __( 'Default', 'themeslug' ),
    'is_default' => true,
    'inline_style' => '.wp-block-group.is-style-default {}'
) );
次はカスタムスタイルを作ってください。
register_block_style( 'core/group', array(
    'name' => 'widget',
    'label' => __( 'Widget', 'themeslug' ),
    'inline_style' => '.wp-block-group.is-style-widget {
        background-color: #faf0e6;
        border-radius: 25px;
    }'
) );
name はカスタムスタイルの名前、そして inline style はカスタムスCSSの設定場所である。ここはグループというブロックをカスタムするので css には .wp-block-group とする。
そしてスタイル名は widget ので後ろに .is-style-widget とする。
最後には add_action() で作った関数を実行する。
add_action( 'init', 'themeslug_register_block_styles' );